Plugins
Note
Plugins are only active in a licensed version of CurveExpert Professional, or while CurveExpert Professional is within its trial period.
What is a plugin?
A plugin is a tool that can be used to automate tasks within CurveExpert Professional. It is a Python script with a few specific functions (the most important one is the
run() function, which is executed whenever the plugin is run from within CurveExpert Professional), and in these functions, you can perform whatever task needs to be
accomplished. Some common Python modules are already available (such as numpy, scipy, wxPython, and obviously all of the standard modules that ship with Python)
for your use, or you can import the api module (see
Appendix E: Plugin API) in order to control CurveExpert Professional’s behavior, such as calculating a particular result that you desire. In addition, you can import any Python modules that you have locally installed.
Plugins are extremely flexible; one can perform practically any task with them. For example, one could easily write a plugin that downloads data from a remote web server, performs a nonlinear regression on it, and writes out the result of that nonlinear regression.
Running a Plugin
Once a plugin is installed, it can be executed by selecting it from the Plugins menu, or by double clicking it in the Plugins pane. Running the plugin
calls its run() function. If there is no Plugins menu, this means that there are no plugins currently enabled; the menu will automatically appear
as soon as runnable plugins are present. See Managing Plugins for how to enable and/or install a plugin.
In order to run a plugin from the command line, please see Running Plugins from the Command Line for how to perform this properly.
Managing Plugins
To access the plugins manager, select Tools->Manage Plugins. This displays the dialog below:
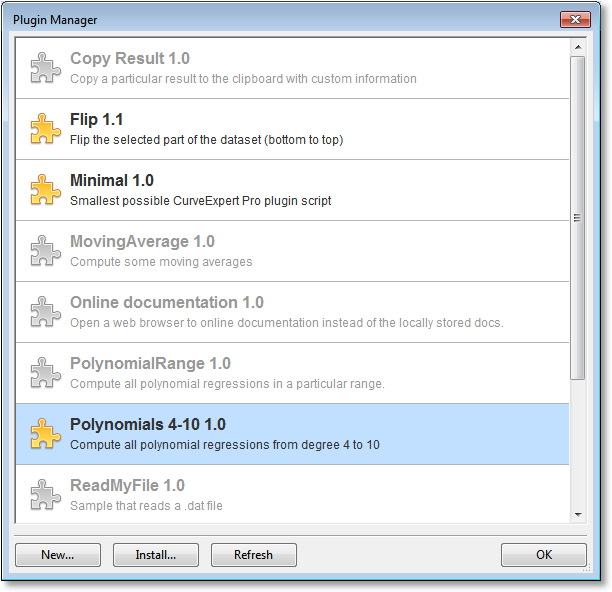
All plugins that are installed are listed here; out of the set of installed plugins, enabled plugins are shown in color (disabled plugins are dimmed).
Enabling/disabling a plugin
To enable or disable a plugin, right click the desired plugin, and select Enable or Disable as appropriate. Disabling a plugin cause it to be dimmed in the manager, and will not appear in the Plugins menu or in the Plugins pane in CurveExpert Professional.
Creating a new plugin
Create a new plugin by clicking the New button at the bottom of the manager, and give the new plugin a name. This will create a skeleton plugin, with the necessary functions and attributes already present, for you to begin to work with. To edit your new plugin, either double click it in the manager, or right click it and select Edit.
Cloning a plugin
Sometimes, it’s easiest to start from an existing example. To clone any plugin, right click it and select Clone. This will create another copy of a plugin. To edit your newly cloned plugin, either double click it in the manager, or right click it and select Edit.
Installing a plugin
If your plugin file was created outside of CurveExpert Professional, or sent to you by a colleague, it must be installed before use. Click Install from within the manager, browse for the plugin file (either .py or.pyc), and open it. This will install the plugin, and it will be available just like any other. Installing essentially copies the plugin file from its current location to $HOME/.curveexpert/plugins.
Uninstalling a plugin
To get rid of a plugin entirely (when you know that you don’t want it any more; otherwise, just disable it), right click the desired plugin and select Uninstall. Uninstalling deletes the plugin file from $HOME/.curveexpert/plugins (or $HOME/.curveexpert/plugins-disabled).
Writing/Editing Plugins
To edit a plugin, either double click it in the manager, or right click it and select Edit. This will display a Python code editor as follows:
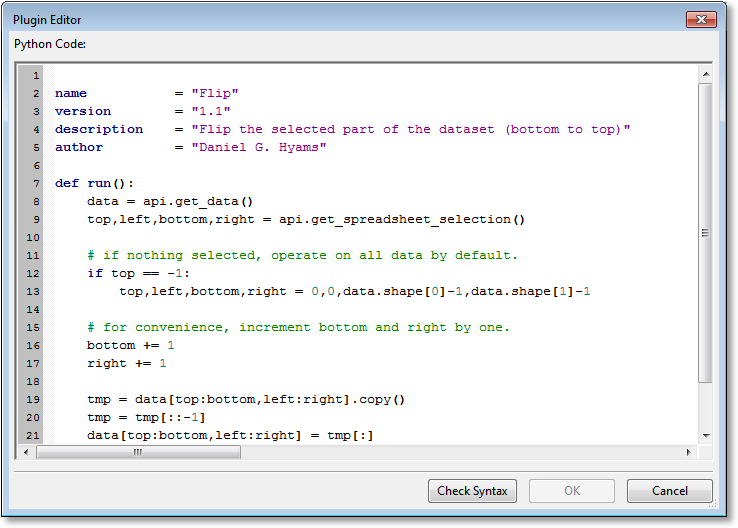
It should be noted that the CurveExpert Professional API module is always automatically imported for you, and is available directly in the api namespace. Documentation for all available
API calls is given in Appendix E: Plugin API. Importing of other desired Python modules is easy, using the standard Python import statement.
At any point during the editing, the Check Syntax button can be clicked, which performs a test-import of the plugin. If there is an error, the offending line and traceback is shown at the bottom of the dialog. The editor also will not allow the plugin to be saved until it has gone through a syntax check, once editing of the plugin is detected.
For complicated plugins, it is probably more desireable to perform the development in a real development tool, such as Eclipse or Netbeans. In this case, simply edit the plugin file and save it somewhere on disk; then install the plugin as documented above.
Your plugin may contain any number of functions (defined by the def keyword); however, there are several special functions that are reserved for a special purpose. These
functions are run, initialize, and the set of hook functions documented below. Further, there are several module-global attributes that hold special meaning for a plugin;
name, version, description, and author.
The run() function
Every plugin must have a run() function; this is the function that is executed any time the user “picks” your plugin from the Plugins menu.
The run() function can optionally have arguments. Arguments that are mandatory have no default value, and arguments that are optional do (see the “Plugin with Arguments” example plugin).
If your run() function has arguments, the following dialog will open when the plugin is run:
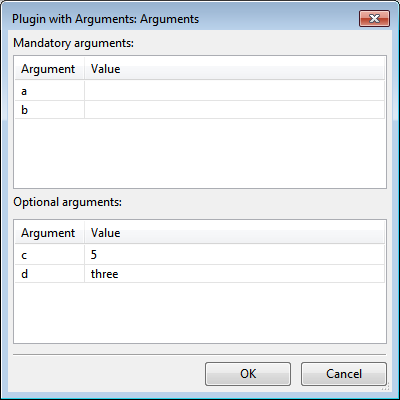
The user is given an opportunity to fill in the arguments, and your script is free to use these arguments in any way appropriate. Note that regardless of the type of
your arguments given in your run() function, all arguments are passed to your script as strings. Thus, you (as the plugin writer) are responsible for checking the
arguments for validity and converting them to the correct type before using them.
The initialize function
The initialize() function is called whenever the plugin is added to the Plugins menu. This is a good place to perform one-time initialization of data that might be
needed later for the run() function. Note that the initialize() function can be called multiple times in one session, if the user enables/disables the plugin (upon each
enabling, the initialize() function is called). This function takes no arguments.
If there is no initialization needed, this function may be omitted from your plugin.
Metadata
There are four attributes that every plugin should have: name, version, description, and author. The most important of these is name, which obviously
defines the name of the plugin. This name is the one that appears in the Plugins menu that the user interacts with. The other attributes are informational metadata that
is displayed in the Plugins manager only.
Hook functions
Plugins can respond to several high-level events that occur during the execution of CurveExpert Professional. To respond to an event, all you have to do is make sure that you have a function present in your plugin that services the event. These functions have specified names, as documented below.
on_writefile(file_name, userdata)
The on_writefile hook is called any time that a CXP file is being written. This hook gives the plugin author an opportunity to
store information persistently in a CXP file. An example follows:
def on_writefile(file_name, userdata):
    api.message("A file is being written: %s"%file_name)
    userdata['my_special_plugin'] = [1,2,3,4,5]
The userdata parameter is a dictionary that the plugin author can add information to, and the information added to this dictionary is stored in a CXP file. Note that this dictionary can be used by other plugins as well, so it is highly recommended to store all plugin-specific information under a unique key that is specific to the plugin.
The only requirement for items placed in the userdata dictionary is that they are picklable.
on_readfile(file_name, userdata)
The on_readfile hook is called any time that a CXP file is read. This hook gives the plugin author an opportunity
to read any of the plugin-specific data stored in the on_writefile hook. An example follows:
def on_readfile(file_name, userdata):
    api.message("A file is being read: %s"%file_name)
    something_i_saved = userdata['my_special_plugin']
The userdata parameter is a dictionary that the plugin author can read information from, that was saved via the plugin in the on_writefile hook.
on_datachanged()
The on_datachanged hook is called any time that the dataset is changed. An example follows:
def on_datachanged():
   api.message("Detected a change in the data.")
on_resultsadded(list_of_result_objects)
The on_resultsadded hook is called any time that results are added. The hook should take a single argument, which is the list
of added results. An example follows:
def on_resultsadded(list_of_results):
   for result in list_of_results:
      do_something(result)
Examples
Example plugins are given in the resources/default_files/plugins directory of the CurveExpert Professional distribution. These plugins are installed automatically by default, but are initially disabled. To see these examples, open the Plugins manager, and double click one of them. These examples will get you started with the concept of writing plugins for CurveExpert Professional. Remember that anything that you want can be done in a plugin, because they are essentially Python codes that can be as complex as need be to accomplish a task.
Miscellaneous
At the time of this writing, the version of embedded Python with CurveExpert Professional is version 2.6.6. As such, the Python language features offered by this application are identical to this Python version.
It can be convenient for different plugins to share the same code. To support this, you have three choices:
place the code that you want to share in a Python file, and put the file in $HOME/.curveexpert/plugins-common. This path is always searched when importing Python modules within plugins.
place the code that you want to share in a folder/directory of your choice, and set the environment variable AUX_MODULE_PATH to this directory before running CurveExpert Professional.
place the code that you want to share in a folder/directory of your choice, and set the environment variable PYTHONPATH to this directory before running CurveExpert Professional.
Note that both of the environment variables PYTHONPATH and AUX_MODULE_PATH can be set to multiple paths, and all of these paths will be searched. Under Windows, separate each path with a semicolon; otherwise separate with a colon. For example, under Linux, you might do (depending on your shell):
% export AUX_MODULE_PATH=/my/first/path:/my/second/path
Running Plugins from the Command Line
As of version 2.6.5, CurveExpert Professional has the ability to run a user-defined plugin from the command line, with no need to open the graphical interface. This feature allows users to make use of the computational features of the software in automated scripts.
Note
Since there is no user interface present, none of the plugin API’s that require a window handle, or operate on the UI, can be used.
To run a plugin from the command line, execute the following on a Windows platform:
cepro.exe --plugin <path to your plugin > --parg <argument 1> --parg <argument 2> ... [Windows]
On a Linux platform:
./cepro.sh --plugin <path to your plugin > --parg <argument 1> --parg <argument 2> ... [Linux]
and on a macOS platform:
open /Applications/CurveExpertPro.app --args --plugin <path to your plugin> --parg <argument 1> ...
for example:
cepro.exe --plugin c:\my_plugins\test_plugin.py --parg c:\my_data
./cepro.sh --plugin /home/user/my_plugins/test_plugin.py --parg /home/user/my_data
open /Applications/CurveExpertPro.app  --args --plugin /Users/me/my_plugins/test_plugin.py  --parg ~/test_data
Log messages from CurveExpert Pro as it runs your custom plugin will be available in the standard log file, and is useful for debugging. See Where files are located for there the log files are located on your particular system.
Due to technical reasons that cannot be adequately explained briefly, under Windows and macOS CurveExpert Pro always runs asynchronously. This means that the application will return almost instantaneously, even though the work is not complete yet. If this is a problem, you should use a synchronization mechanism in your plugin, the simplest of which is a file that you will create or update when the plugin’s work is complete. This way, your driving script knows when it can continue on, by monitoring the existence of this “sync” file. Under Linux, CurveExpert Pro runs synchronously as expected.