CurveExpert Options
The Options dialog allows you to set important parameters that
CurveExpert will use during operation. Two separate sets of user
preferences are maintained for the single and double precision
versions (registered users only).
If an invalid entry has been entered in any of the tabbed pages,
then the offending entry will be selected, and the computers
speaker will sound.
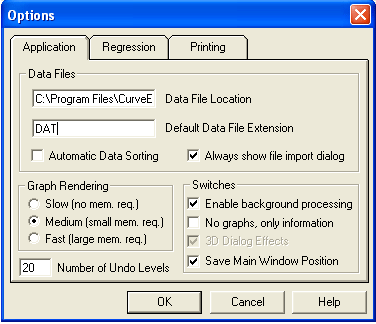
Application Options
The application options tabbed page sets user preferences that
control the overall behavior of CurveExpert in the Windows
environment.
Data Files
- Data File Location: The directory in which you store your data
files can be input in this edit field. For convenience, each time
CurveExpert is started, the directory will be automatically changed
to this working directory. By default, this directory is set to be
the CurveExpert home directory.
- Default Data File Extension: If a file extension is not
supplied in the File|Open or File|Save dialog box, then this
extension is automatically added. Default: DAT
- Automatic Data Sorting: Selecting this checkbox will
automatically sort any data file as it is read into CurveExpert.
Default: Off
- Always show file import dialog: Selecting this checkbox will
cause the file import dialog to always appear when a file is
selected to read into CurveExpert. This dialog will give access to
all of CurveExpert features for parsing data files. When this
checkbox is cleared, CurveExpert will attempt to intelligently read
the data file based on the number of columns that it detects.
Graph Rendering
The graph rendering radio buttons may be set to Slow, Medium, or
Fast. Each setting has advantages and disadvantages.
- The “Slow” setting requires no extra memory, but all graphs are
drawn from scratch when their window is resized or uncovered.
- The “Medium” setting requires a small amount of extra memory and
behaves like the “Slow” setting, with the exception that any
user-model graphs will be drawn using “Fast” rendering. See below;
this is the default.
- The “Fast” setting requires a large amount of extra memory,
because the contents of every graph window are cached for quick
redraws. The graph is only drawn the first time it is opened, and
each time it is resized. Any other graph viewing will take a
minimal amount of time to redraw, since the image is stored in
memory. This option is most useful for users who have extremely
large data sets that take a long time to draw.
Switches
- Enable Background Processing: When CurveExpert is iterating, it
can take complete control over Windows (faster), or do its
processing in the background (slower). Checking this checkbox will
force CurveExpert to do its calculations in the background. This
is recommended, since certain windows processes need attention
often. On the other hand, if CurveExpert is the only application
running, then the best performance will be obtained by leaving this
box unchecked. Default: Enabled
- No graphs, only information: CurveExpert gives you the option
of viewing the graph first, or the fit information first. If this
checkbox is selected, the model information (coefficients, etc.)
will be shown directly, instead of a graph. Default: Disabled
- 3D Dialog Effects: Attractive (in the opinion of the author)
gray dialogs with 3D effects are the default in CurveExpert. If
you prefer the white dialogs with no 3D effects, deselect this
checkbox. Note that this options is largely obsolete; as all
versions of Windows later than Windows 95 have 3D dialog effects by
default. Default: Enabled.
- Save Main Window Position: CurveExpert saves the position of
the main window when the application is exited, so that when it is
opened again, it assumes the same position. If this behavior is
undesirable, deselect this checkbox. Default: Enabled.
Setting the number of Undo Levels
- Number of Undo Levels: CurveExpert implements a multilevel undo
system for the built-in spreadsheet. The number of actions that
can be undone can be set in this edit field. The number of levels
of undo must range from 1 to 99. If your system has low amounts of
memory, then a low number of undo levels will be conserve this
memory. Default: 20.
Regression Options
The regression options tabbed page sets user preferences that
control the regression and mathematical operation of CurveExpert.
Linear Regression
- Maximum Polynomial Degree: Enter the maximum degree of a
polynomial allowed by CurveExpert in this field. This setting
determines the number of polynomials examined by CurveFinder in a
search sweep, and it also prevents choosing a wildly oscillating
polynomial by accident. This number may not exceed 19. Default:
10
- Default Polynomial Degree: Enter the default degree of
polynomials used in CurveExpert in this field. The default
polynomial degree is the polynomial that will be calculated by the
Calculate Groups command, and the degree that will appear by
default when you select a polynomial from the Apply Fit menu.
Default: 4
Nonlinear Regression
- Regression Tolerance: Enter the desired tolerance for nonlinear
regression convergence in this field. The nonlinear algorithm uses
this number to determine whether or not it has converged on the
correct model parameters. Mathematically speaking, the difference
between the standard errors in two consecutive iterations must be
smaller than this tolerance for the computation to terminate. The
smaller the tolerance, the more accurate the parameters will be,
but the algorithm will take much more time to converge. Default:
1e-6
- Diverging Iterations: Enter the number of iterations that the
standard error (mentioned above) must increase for the algorithm to
declare divergence. Default: 10
- Maximum Iterations: Enter the maximum number of iterations for
the nonlinear algorithm to perform before it is forced to
terminate. Default: 100
General Regression
- Weighting: CurveExpert can either perform no weighting for each
point, or weight each point by 1/y^2 as the nonlinear regression
progresses. Using no weighting is most appropriate when no known
relationship exists between the variances of the data around the
fitted curve and the y values of the points. However, it is often
the case in experiments that it is known that the uncertainty is a
certain percentage of the y value; in this case, weighting the
points by 1/y^2 can prevent the larger scatter at higher y from
adversely affecting the regression model. Default: No Weighting
- Automatic Initial Guesses: Enabling this checkbox will let
CurveExpert generate initial guesses for built-in nonlinear
regressions for you. This option, in effect, enables AutoGuess
upon startup. Default: Enabled
- Quick Derivatives: The partial derivatives of the model with
respect with each of its parameters is required in the
Levenberg-Marquardt algorithm for nonlinear regression.
CurveExpert uses central differencing to approximate these partial
derivatives; however, more precise approximations can be
accomplished using Richardsons extrapolation. Checking the “Quick
Derivatives” checkbox uses simple central differencing; leaving
this checkbox unselected forces CurveExpert to use Richarsons
extrapolation for the numerical derivatives. The latter is more
accurate, but much slower than using central differences.
Default: Enabled
Printing Options
The printing preferences tabbed page sets user preferences that
control printing settings and margins that CurveExpert will use for
graph hardcopies and data tables.
- Current Printer Info: This section shows all information for the
currently selected printer. The name, driver version, orientation,
paper size, and resolution are shown.
- Default Print Type: The default print type determines whether
the “Black and White” or “Color” printing selection will be
automatically selected when a graph is printed. Of course, the
user may change the selection at print-time. This option is
included for the convenience of color printer users. Default:
Black and White.
- Print Margins: The top, left, bottom, and right margins (in
inches) can be set in each of these edit fields. Note that no
margin can be less than 0 inches, and no corresponding margins can
add to higher than the paper extent plus the unprintable margin.
- Print Setup: Press the Print Setup button to change the current
printer and/or the printer configuration.
